Suit Combinations: Guide to Playing Your Cards Right
You’re declarer, dummy comes down, and you’ve got ♥AQJ54 in your hand opposite ♥K82 in dummy. Nine hearts between the hands, missing the ten. Do you finesse? Play for the drop? Does it matter?
This is a suit combination, and knowing how to handle them separates average declarers from good ones.
What Are Suit Combinations?
A suit combination is the specific holding you have in one suit between your hand and dummy. The question is always the same: given these cards, what’s the best way to play them to get the most tricks?
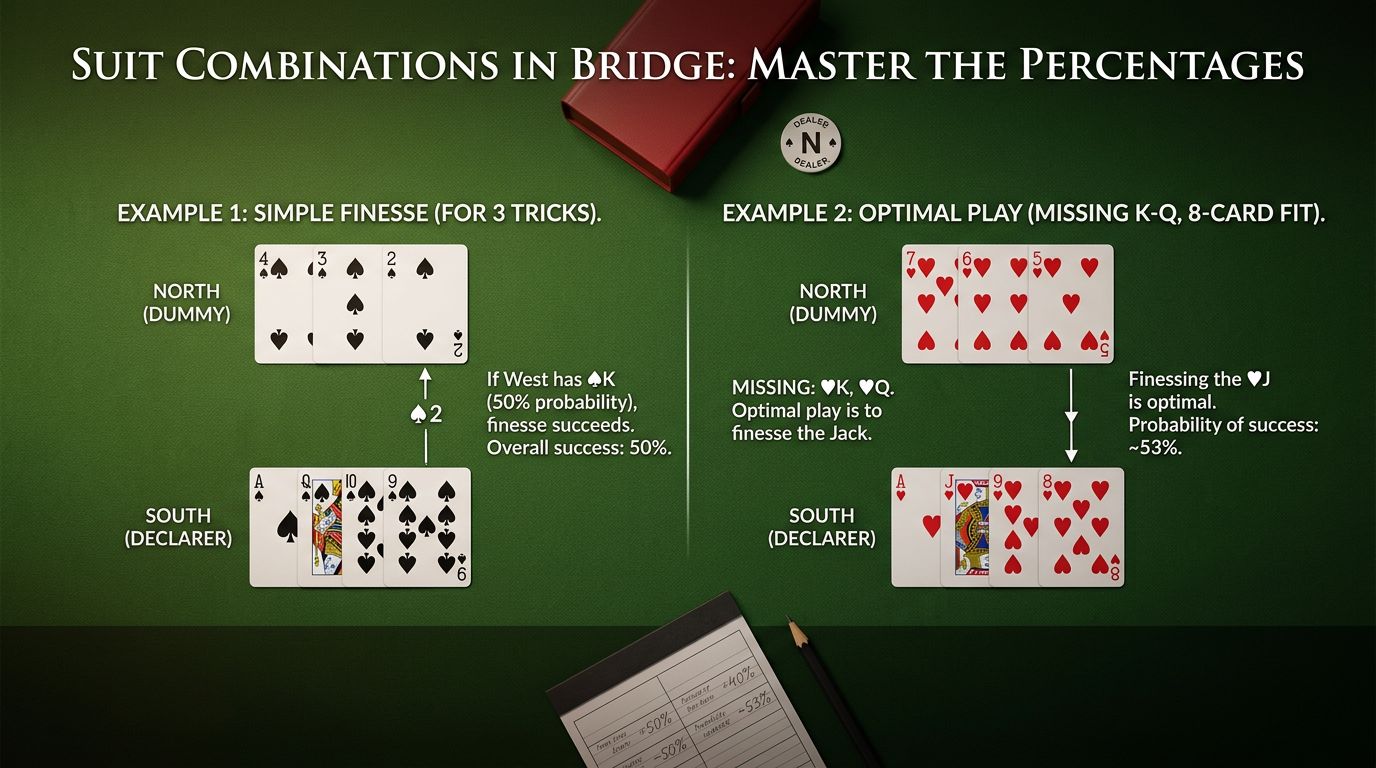
Some combinations are simple. With ♠AK opposite ♠Q32, you’re taking three tricks. No decisions needed.
But most combinations involve real choices. Should you finesse or play for the drop? Which opponent should you finesse against? Should you go for maximum tricks or play safe?
The math behind suit combinations comes down to probability. When West and East each hold two unknown cards, the combinations aren’t equally likely. A 3-2 split (68%) is way more common than 4-1 (28%) or 5-0 (4%). The 2-2 break you’re hoping for? That’s only 40%, not 50%.
Standard bridge references list hundreds of suit combinations with the mathematically correct play for each one. You don’t need to memorize them all. But you should know the common patterns and understand the principles behind them.
The Classic: AKJxx Opposite xxx
Let’s start with one that comes up constantly: ♦AKJ65 in your hand, ♦843 in dummy. You’re missing the queen. Eight cards between the hands.
Play the ace. Then play the king.
If the queen drops, you’re done. If it doesn’t, you’re finessing West for it on the third round.
Why not finesse immediately? Because the queen is more likely to drop doubleton (about 52%) than to be sitting favorably for a finesse (50%). When you cash the ace and king first, you win when the queen is doubleton in either hand. If you finesse immediately, you only win when West has the queen.
But what if you need all five tricks right now? Then you have to finesse immediately and hope West has Qx or longer. Playing for the drop guarantees you only four tricks when the queen doesn’t appear.
This is the tension in every suit combination: maximum tricks versus best percentage.
Timing Matters: AQxxx Opposite xx
You hold ♠AQ754 opposite ♠J3. You’re taking a finesse either way, but when?
If you can only afford to lose one trick, start with a low card to the jack. If it loses to the king, come back and finesse the queen. This picks up Kxx in West and also gains when East has the singleton king (he has to play it on your jack).
If you need all five tricks, lead toward the AQ and finesse immediately. You’re playing for West to have both the king and ten. Lower odds, but it’s your only shot at running the suit.
The timing of your finesse affects which holdings you can pick up. Starting with the jack works against Kxx in West. Starting with the queen works against K10 in West. They’re not the same.
Eight Ever, Nine Never
Missing the queen with nine cards between the hands is one of bridge’s most famous situations. The rhyme goes: “Eight ever, nine never.” With eight cards, always finesse for the queen. With nine cards, never finesse, play for the drop.
The math backs this up. With nine cards out, the opponents hold four cards including the queen. A 2-2 break (where the queen drops) happens about 40% of the time. A 3-1 break with the queen sitting favorably for your finesse? About 25%.
Play the ace, play the king, the queen drops.
Except when it doesn’t. And that’s fine! You played the percentages. Sometimes the 60% happens.
There are exceptions. If you have a strong inference that one opponent is long in the suit (maybe they opened a weak two in another suit and are known to be short), you finesse the other opponent. Bridge is about combining probabilities with information.
With eight cards, the split is more even. The queen being favorably placed for a finesse is roughly equal to it dropping, so you finesse. The opponents have five cards, and 3-2 splits are most likely.
Safety Plays vs. Maximum Plays
You’re in 6NT. You have ♥AKJ103 in hand, ♥652 in dummy. You need four heart tricks to make your slam.
The maximum play is to finesse West for the queen. If it works, you get five tricks. But if East has Qxxx, you might get only three.
The safety play is different: cash the ace first. If the queen drops from East (singleton), you’re golden. If not, lead toward the KJ10, planning to finesse West. This guarantees four tricks whenever hearts are 3-2, regardless of where the queen sits.
The safety play costs you a trick when West has queen-fourth and you could have taken five tricks by finessing immediately. But in a slam, you don’t care about five tricks. You need four. You’re willing to give up the overtrick to ensure your contract.
In 3NT where you need five heart tricks for your contract? You can’t afford the safety play. You have to finesse and hope.
The decision between safety and maximum plays depends on your contract. In partscores, you often want maximum tricks for your matchpoint score. In games and slams, safety matters more.
Restricted Choice: A Quick Principle
You hold ♣AJ1098 opposite ♣432. You finesse the jack, and East plays the queen. On the next round, do you finesse again or play for the drop?
Finesse again.
This is restricted choice. When East played the queen, it might have been from KQ doubleton (he had no choice) or from a singleton queen (also no choice). But if East has the singleton king, he would have played it, you would have seen it. And if he had KQ tight, he might have played the king instead of the queen.
The math says that the queen being singleton is roughly twice as likely as it being from KQ doubleton, because with KQ, East had a choice of which honor to play. That choice makes the actual layout less likely.
This isn’t intuitive. Your gut says “the king and queen are equally likely to be in either hand.” Restricted choice says “but you saw the queen, and that matters.”
You don’t need to understand the full proof. Just remember: when an honor appears where you’re missing two touching honors, play for that honor to be singleton and finesse again.
Six Essential Suit Combinations
Here are the combinations you’ll face constantly. Learn these cold.
1. AK10xx opposite xxx (Missing QJx)
Cash the ace. Then lead low toward the ten. This picks up QJx in West (finesse the ten) and also wins when the queen or jack is singleton in East. Better than leading the ten from dummy, which only works when West has both honors.
2. AJ10x opposite xxx (Missing KQ9)
Lead low to the jack. If it loses to the queen or king, come back and lead low to the ten. This is a double finesse, and it picks up KQ9 in West. You get three tricks about 25% of the time, two tricks most of the time.
3. AKxxx opposite xxx (Missing QJxx)
If you need all five tricks, you’re hoping for 3-2 with the queen and jack both dropping. If you can afford to lose one trick, cash the ace and king. If an honor drops, you’re probably good. If not, you’re guessing on the third round.
4. A10xxx opposite Kxx (Missing QJx)
Cash the king first. If an honor drops from East, finesse the ten coming back. If West drops an honor, you might be able to finesse them for the other one. This is better than immediately finessing the ten, because you might catch a singleton honor.
5. AQJ opposite xxx (Missing K10xx)
Finesse West twice. Lead low to the queen, come back and lead low to the jack. You’re hoping West has both the king and ten. If East has the king, you’re getting only two tricks, but that’s the breaks.
6. AQ10 opposite xxx (Missing KJxx)
Lead low to the ten. If it loses to the jack, come back and finesse the queen. If the ten loses to the king, West probably has the jack too, so you finesse the queen next. This is called a backward finesse or intra-finesse, and it picks up KJ9x in West.
7. K10xx opposite Axx (Missing QJx)
Cash the ace. Then lead toward the K10 and finesse the ten. If East has QJ tight, you pick up both honors. Better than cashing ace-king and hoping, because you’re using entries efficiently.
8. AKJ10 opposite xxx (Missing Qxx)
Finesse twice against West. Lead low to the ten, come back and lead low to the jack. If West has the queen, you’re getting four tricks. If East has it, you get three. Don’t bother cashing the ace first unless you’re worried about a singleton queen in East, which is unlikely with seven cards out.
How to Figure Out Unfamiliar Combinations
You’re in a contract, and you’ve got ♦AJ87 opposite ♦K1054. You need four tricks. What’s the play?
Here’s how to think through any unfamiliar combination:
Count your tricks. You have two top tricks (ace and king). You need two more.
Identify the missing honors. You’re missing the queen and nine. If you can catch the queen, you’re probably good.
Consider the layouts. Where would the queen need to be for you to succeed? If West has Qxx, can you finesse twice? If East has Qxx, can you drop it?
Think about entries. Can you get back and forth between hands to take multiple finesses if needed?
Check for safety plays. Is there a line that guarantees your contract even if it costs an overtrick?
For this specific combination, the answer is: cash the ace and king. If the queen drops doubleton, great. If not, you’re probably going down, but that was going to happen anyway. There’s no finesse that helps here because you’re missing the nine as well as the queen.
Sometimes the answer is “you need a miracle.” That’s fine. Play for the miracle and move on.
Practice Your Card Play with Brian
Ready to apply these techniques at the table? Brian can walk you through hands that test your card play skills. Try Brian free →
Practice at the Table
Suit combinations aren’t just theory. You see them in every hand you declare.
When dummy comes down, take those extra seconds. Look at each suit. Count your tricks. Spot the combinations. Think about which line gives you the best chance.
Don’t rush the first trick just because it seems obvious. The queen-third sitting over your ace-jack might turn your automatic-looking contract into a guessing game.
And when you go down because you finessed and it lost? Check whether you played the percentages correctly. If you did, you’ll sleep fine. If you didn’t, you learned something.
The best declarers aren’t the ones who always guess right. They’re the ones who consistently make the percentage play and don’t beat themselves up when it doesn’t work.
Learn the common combinations. Understand the principles. Trust the math. That’s how you get better at this game.