Splinter Bids: Show Fit, Slam Interest, and Shortage Complete Guide
A splinter bid is one of the most elegant and powerful tools in modern bridge for exploring slam possibilities. With a single bid, you tell partner three critical things: you have strong support for their suit, game-forcing values, and shortness in the suit you just bid. This information transforms how both partners evaluate their hands for slam.
What Is a Splinter Bid?
A splinter bid is an unusual jump, typically a double jump, that shows:
- Four or more cards in partner’s suit (usually four, occasionally five)
- Game-forcing values (13+ points in standard methods)
- A singleton or void in the suit bid
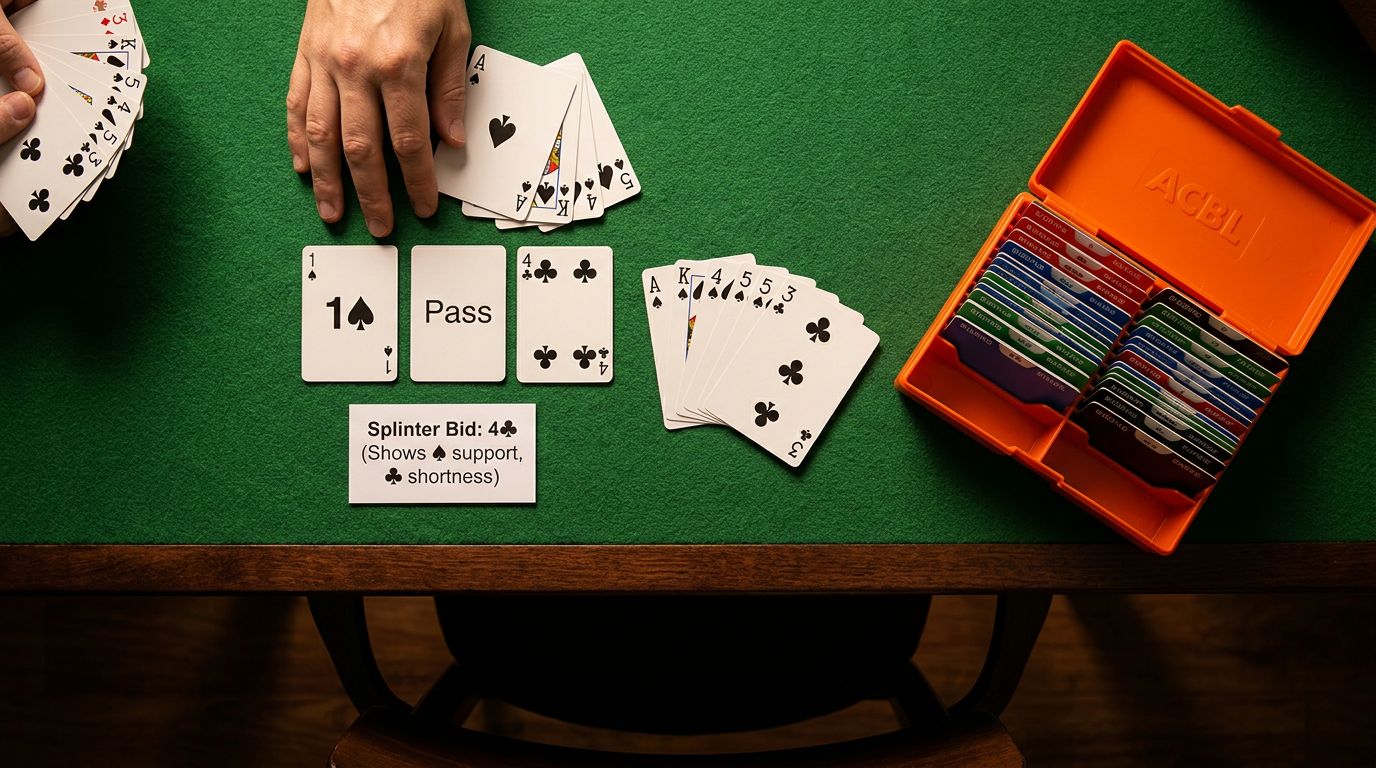
The classic example: partner opens 1♥, and you hold ♠AKJ5 ♥KJ82 ♦5 ♣A843. Instead of making a simple raise or temporizing with a new suit, you jump to 4♦—a splinter bid showing heart support, slam interest, and diamond shortness.
The beauty of a splinter is that it’s descriptive rather than natural. You’re not suggesting diamonds as a contract; you’re painting a picture of your hand. This allows partner to immediately assess whether your hands fit well together.
The Requirements: When Can You Splinter?
To make a splinter bid, you need:
1. Four-Card (or Better) Support
You promise at least four cards in partner’s suit. This is crucial, partner needs to know they’ve found a solid trump fit.
2. Game-Forcing Values
Typically 13-15 high card points, though distribution counts heavily. With 16+ points and a singleton, you’re often too strong for a splinter and should explore other sequences.
3. A Singleton or Void
The key feature! You’re showing exactly one card (singleton) or no cards (void) in the suit you bid. Some partnerships distinguish between singletons and voids (using different sequences), but most treat them the same initially.
4. No Wasted Values in the Short Suit
Ideally, your singleton is a small card, not an honor. A singleton king is more problematic, you might prefer a different approach when holding one.
Why Splinters Work: The Magic of Shortness
The power of a splinter comes from how it helps partner evaluate their hand. When you show shortness in a suit, partner knows immediately whether their high cards are working or wasted.
Consider this scenario:
Your hand: ♠AQ84 ♥KJ95 ♦6 ♣AJ32
Your bid: 1♥ - 4♦ (splinter showing heart support, diamond shortness)
Partner’s hand #1: ♠K5 ♥AQ1063 ♦AKJ ♣974
Partner has 15 HCP, but three diamond honors opposite your singleton are largely wasted. The ♦AKJ will take three tricks whether you have one diamond or five. Partner should sign off in 4♥.
Partner’s hand #2: ♠K5 ♥AQ1063 ♦974 ♣AKJ
Now partner’s 15 HCP are all working. Your club honors mesh beautifully with partner’s ♣AKJ, and the diamond shortness means no wasted values. Partner should explore slam with 4NT or a control bid.
This is the essence of splinters: they let you evaluate fit, not just points.
Common Splinter Sequences
After a Major Suit Opening
The most frequent splinter situations occur after 1♥ or 1♠ openings:
1♥ - 4♣: Shows 4+ hearts, game-forcing values, and club shortness
1♥ - 4♦: Shows 4+ hearts, game-forcing values, and diamond shortness
1♥ - 3♠: Shows 4+ hearts, game-forcing values, and spade shortness
1♠ - 4♣: Shows 4+ spades, game-forcing values, and club shortness
1♠ - 4♦: Shows 4+ spades, game-forcing values, and diamond shortness
1♠ - 4♥: Shows 4+ spades, game-forcing values, and heart shortness
Note that 1♥ - 3♠ is typically needed as a splinter because 1♥ - 4♠ would be beyond game and awkward.
By Opener After a One-Level Response
Opener can also splinter after responder bids a suit at the one level:
1♦ - 1♠ - 4♣: Shows 4+ spades, game-forcing values, club shortness
1♦ - 1♠ - 4♥: Shows 4+ spades, game-forcing values, heart shortness
1♣ - 1♥ - 3♠: Shows 4+ hearts, game-forcing values, spade shortness
This allows the opening hand to immediately show support and shape when holding 4-card support for responder’s major and a distributional hand.
Partner’s Evaluation: The Critical Decision
After receiving a splinter bid, partner must make the most important decision: are we in the slam zone or not?
Ask Yourself Three Questions:
1. Do I have wasted honors in partner’s short suit?
If you hold ♦KQJ and partner splinters in diamonds, those cards lose significant value. Each honor opposite a singleton represents wasted potential.
2. Are my honors in partner’s other suits?
If your high cards are in the suits where partner can use them (including trumps), slam becomes attractive.
3. Do I have extra trumps or side-suit controls?
A fifth trump, aces in side suits, or additional distribution all increase slam chances.
The Decision Matrix:
Sign Off in Game When:
- You have 2+ honors in partner’s short suit
- You have a minimum opening (12-14 HCP)
- Your hand is flat (4-3-3-3 or similar)
- You lack controls outside trumps
Explore Slam When:
- You have no wasted values in the short suit
- You have 15+ working high card points
- You hold aces and kings in working suits
- You have extra trumps (5+ cards)
- You have your own distribution
Complete Hand Examples
Example 1: Perfect Fit
Responder: ♠AKJ4 ♥Q973 ♦6 ♣AJ85
Opener: ♠Q85 ♥AK1062 ♦A83 ♣K9
Auction:
Opener    Responder
1♥        4♦ (splinter)
4♠        4NT
5♦        6♥
Pass
Opener has no wasted diamond values and excellent controls. After the splinter, opener cue-bids 4♠ (showing the ♠Q as a control). Responder uses Blackwood, finds one keycard missing, and bids the excellent slam.
Example 2: Wasted Values
Responder: ♠KJ84 ♥KJ93 ♦7 ♣AQ84
Opener: ♠A95 ♥AQ1064 ♦KQJ3 ♣5
Auction:
Opener    Responder
1♥        4♦ (splinter)
4♥        Pass
Despite having 15 HCP, opener recognizes that ♦KQJ opposite responder’s singleton is largely wasted. Opener signs off in 4♥, which is the limit of the combined values. The ♦KQJ will take three tricks, but those tricks would be available even if responder had ♦765.
Example 3: Opener Splinters
Opener: ♠AQJ6 ♥3 ♦AK85 ♣QJ74
Responder: ♠K9852 ♥AK5 ♦Q64 ♣A8
Auction:
Opener    Responder
1♦        1♠
4♥        4NT
5♥        6♠
Pass
Opener shows spade support and heart shortness. Responder’s heart honors are working perfectly, and with excellent controls, responder drives to slam.
Example 4: Recognizing the Misfit
Responder: ♠AJ95 ♥KJ84 ♦5 ♣AJ93
Opener: ♠KQ6 ♥AQ1095 ♦KJ86 ♣4
Auction:
Opener    Responder
1♥        4♦ (splinter)
4♥        Pass
Both hands have shortness in the same area (opener in clubs, responder in diamonds), which means length opposite shortness. Opener’s diamond honors face responder’s singleton, and responder’s club honors face opener’s singleton. This duplication of shortness means game is plenty. The hand illustrates why evaluation, not just point counting, matters.
Common Mistakes to Avoid
1. Splintering with the Wrong Point Range
Don’t splinter with 17+ HCP. With that strength, start with a forcing bid and show support later, you’re too strong to describe your hand immediately.
2. Splintering with Three-Card Support
A splinter specifically promises four-card support. With three good trumps, use a different approach (like a limit raise or forcing raise first).
3. Ignoring Wasted Values as Responder
After partner splinters, don’t just use Blackwood automatically. Evaluate your hand! If you have ♦KQ in partner’s short diamond suit, you may not have the values you think you do.
4. Splintering with a Singleton Honor
A singleton king or ace is problematic because it may be a wasted value. Some players still splinter with a singleton ace (it’s a control), but singleton kings are questionable.
5. Forgetting to Show Extra Values
If partner signs off after your splinter, respect that decision. They’ve evaluated their hand opposite your shortness. Don’t push to slam without additional information.
When NOT to Splinter
1. When You’re Too Strong
With 17+ HCP and support, you’re too strong for an immediate splinter. Start with a forcing bid to avoid limiting your hand too quickly.
2. When You Have Only Three-Card Support
Splinters promise four cards. Use other methods with three-card support.
3. When You Have a Better Descriptive Bid
If you have a two-suited hand (5-5 or better), showing both suits may be more accurate than splintering immediately.
4. When Partner Opened a Minor
While splinters after minor suit openings are theoretically possible, many partnerships have different agreements here. Some use these jumps for other purposes (like fit jumps). Discuss with your partner.
5. In Competitive Auctions
After opponents bid, splinters become less clear and may be confused with other conventional bids. Use judgment and partnership agreements.
Partnership Agreements to Discuss
Before using splinters with a partner, clarify:
1. Point Range
What’s the minimum and maximum for a splinter? Most play 13-15 HCP, but some extend to 16.
2. Singleton vs. Void
Do you distinguish? Some partnerships use different sequences to show voids specifically.
3. After Minor Suit Openings
Are splinters “on” after 1♣ and 1♦ openings? Some partnerships reserve these jumps for other meanings.
4. Trump Quality
Do you promise four to an honor, or is 4-3-2-x acceptable? Many require at least one honor in the trump suit.
5. Delayed Splinters
Can opener splinter on the second round of bidding (e.g., 1♣ - 1♠ - 2♣ - 2♠ - 4♥)? Some partnerships use this to show a minimum opener with support.
6. Responses to Splinters
How do you proceed after a splinter? Do you use control bids, Blackwood immediately, or sign-off bids? Having a clear structure helps avoid misunderstandings.
Practice This Convention with Brian
Want to test your understanding of this convention in realistic hands? Brian, the Bridgetastic AI, can deal you practice hands, walk you through the bidding, and explain when this convention applies, and when it doesn’t. Try Brian free →
The Bottom Line
Splinter bids are powerful precisely because they provide so much information in a single bid. They transform the partnership’s ability to evaluate slam by identifying whether high cards are working together or wasted opposite shortness.
The key to successful splintering is twofold: knowing when to make one, and knowing how to evaluate your hand after partner makes one. Master both sides of this convention, and you’ll find yourselves bidding good slams while avoiding bad ones, the hallmark of expert partnership bidding.
When partner splinters, don’t just count points. Count working points. That’s the difference between hoping for a slam and knowing you should bid one.